Collection

一、概览

容器主要包括 Collection 和 Map 两种,Collection 存储着对象的集合,而 Map 存储着键值对(两个对象)的映射表。

Collection
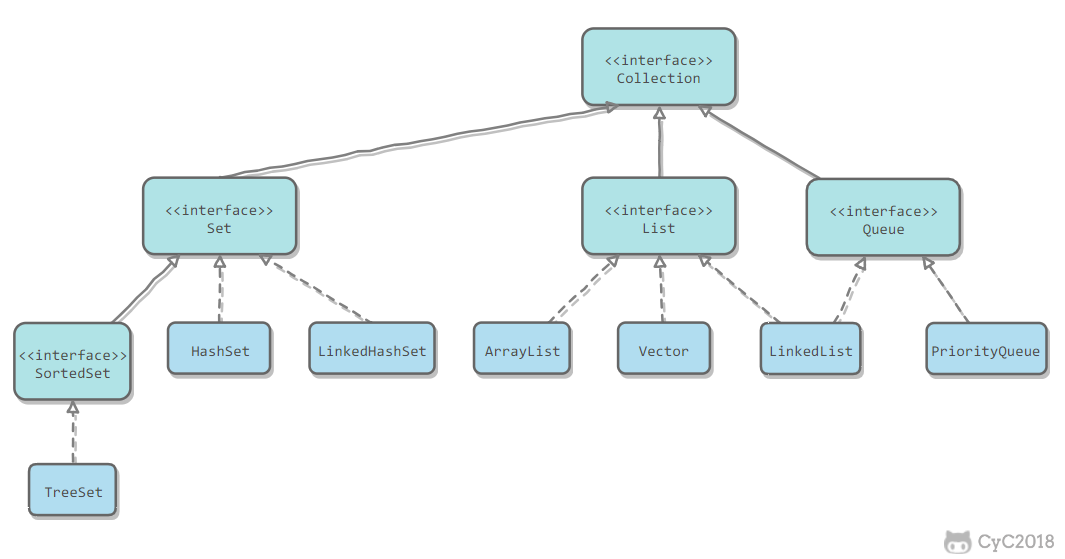
image.png

1. Set

  • TreeSet:基于红黑树实现,支持有序性操作,例如根据一个范围查找元素的操作。但是查找效率不如 HashSet,HashSet 查找的时间复杂度为 O(1),TreeSet 则为 O(logN)。

  • HashSet:基于哈希表实现,支持快速查找,但不支持有序性操作。并且失去了元素的插入顺序信息,也就是说使用 Iterator 遍历 HashSet 得到的结果是不确定的。

  • LinkedHashSet:具有 HashSet 的查找效率,且内部使用双向链表维护元素的插入顺序(或访问顺序)。

2. List

  • ArrayList:基于动态数组实现,支持随机访问。

  • Vector:和 ArrayList 类似,但它是线程安全的。

  • LinkedList:基于双向链表实现,只能顺序访问,但是可以快速地在链表中间插入和删除元素。不仅如此,LinkedList 还可以用作栈、队列和双向队列。

3. Queue

  • LinkedList:可以用它来实现双向队列。

  • PriorityQueue:基于堆结构实现,可以用它来实现优先队列。

Map
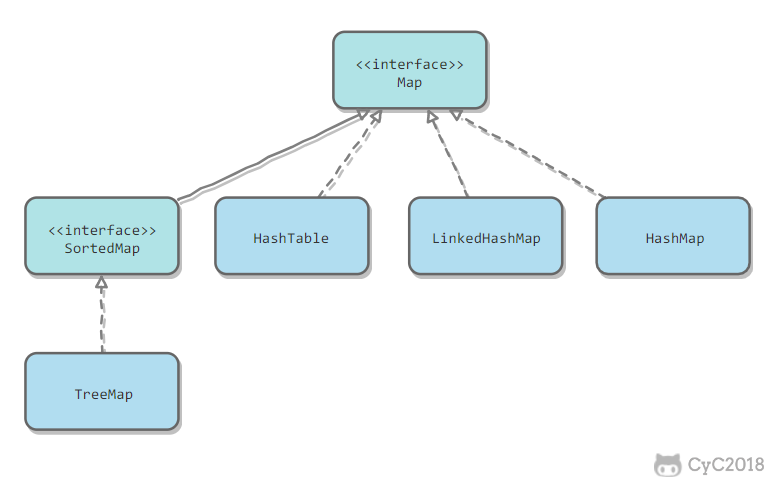
image.png

  • TreeMap:基于红黑树实现。

  • HashMap:基于哈希表实现。

  • HashTable:和 HashMap 类似,但它是线程安全的,这意味着同一时刻多个线程可以同时写入 HashTable 并且不会导致数据不一致。它是遗留类,不应该去使用它。现在可以使用 ConcurrentHashMap 来支持线程安全,并且 ConcurrentHashMap 的效率会更高,因为 ConcurrentHashMap 引入了分段锁。

  • LinkedHashMap:使用双向链表来维护元素的顺序,顺序为插入顺序或者访问顺序顺序。

二、容器中的设计模式

迭代器模式
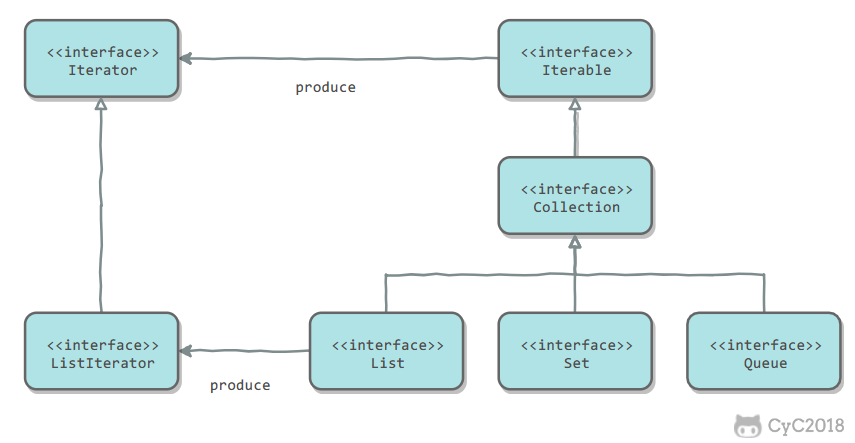
image.png

Collection 继承了 Iterable 接口,其中的 iterator() 方法能够产生一个 Iterator 对象,通过这个对象就可以迭代遍历 Collection 中的元素。

从 JDK 1.5 之后可以使用 foreach 方法来遍历实现了 Iterable 接口的聚合对象。

1
2
3
4
5
6
List<String> list = new ArrayList<>();
list.add("a");
list.add("b");
for (String item : list) {
System.out.println(item);
}

适配器模式

java.util.Arrays#asList() 可以把数组类型转换为 List 类型。

1
2
@SafeVarargs
public static <T> List<T> asList(T... a)

应该注意的是 asList() 的参数为泛型的变长参数,不能使用基本类型数组作为参数,只能使用相应的包装类型数组。

1
2
Integer[] arr = {1, 2, 3};
List list = Arrays.asList(arr);

也可以使用以下方式调用 asList():

1
List list = Arrays.asList(1, 2, 3);

三、源码分析

如果没有特别说明,以下源码分析基于 JDK 1.8。

在 IDEA 中 double shift 调出 Search EveryWhere,查找源码文件,找到之后就可以阅读源码。

ArrayList

1. 概览

因为 ArrayList 是基于数组实现的,所以支持快速随机访问。RandomAccess 接口标识着该类支持快速随机访问。

1
2
public class ArrayList<E> extends AbstractList<E>
implements List<E>, RandomAccess, Cloneable, java.io.Serializable

数组的默认大小为 10。

1
private static final int DEFAULT_CAPACITY = 10;

2. 扩容

添加元素时使用 ensureCapacityInternal() 方法来保证容量足够,如果不够时,需要使用 grow() 方法进行扩容,新容量的大小为 oldCapacity + (oldCapacity >> 1),也就是旧容量的 1.5 倍。

扩容操作需要调用 Arrays.copyOf() 把原数组整个复制到新数组中,这个操作代价很高,因此最好在创建 ArrayList 对象时就指定大概的容量大小,减少扩容操作的次数。

1
2
3
4
5
6
7
8
9
10
11
12
13
14
15
16
17
18
19
20
21
22
23
24
25
26
27
28
29
30
31
public boolean add(E e) {
ensureCapacityInternal(size + 1); // Increments modCount!!
elementData[size++] = e;
return true;
}

private void ensureCapacityInternal(int minCapacity) {
if (elementData == DEFAULTCAPACITY_EMPTY_ELEMENTDATA) {
minCapacity = Math.max(DEFAULT_CAPACITY, minCapacity);
}
ensureExplicitCapacity(minCapacity);
}

private void ensureExplicitCapacity(int minCapacity) {
modCount++;
// overflow-conscious code
if (minCapacity - elementData.length > 0)
grow(minCapacity);
}

private void grow(int minCapacity) {
// overflow-conscious code
int oldCapacity = elementData.length;
int newCapacity = oldCapacity + (oldCapacity >> 1);
if (newCapacity - minCapacity < 0)
newCapacity = minCapacity;
if (newCapacity - MAX_ARRAY_SIZE > 0)
newCapacity = hugeCapacity(minCapacity);
// minCapacity is usually close to size, so this is a win:
elementData = Arrays.copyOf(elementData, newCapacity);
}

3. 删除元素

需要调用 System.arraycopy() 将 index+1 后面的元素都复制到 index 位置上,该操作的时间复杂度为 O(N),可以看出 ArrayList 删除元素的代价是非常高的。

1
2
3
4
5
6
7
8
9
10
public E remove(int index) {
rangeCheck(index);
modCount++;
E oldValue = elementData(index);
int numMoved = size - index - 1;
if (numMoved > 0)
System.arraycopy(elementData, index+1, elementData, index, numMoved);
elementData[--size] = null; // clear to let GC do its work
return oldValue;
}

4. Fail-Fast

modCount 用来记录 ArrayList 结构发生变化的次数。结构发生变化是指添加或者删除至少一个元素的所有操作,或者是调整内部数组的大小,仅仅只是设置元素的值不算结构发生变化。

在进行序列化或者迭代等操作时,需要比较操作前后 modCount 是否改变,如果改变了需要抛出 ConcurrentModificationException。

1
2
3
4
5
6
7
8
9
10
11
12
13
14
15
16
17
18
private void writeObject(java.io.ObjectOutputStream s)
throws java.io.IOException{
// Write out element count, and any hidden stuff
int expectedModCount = modCount;
s.defaultWriteObject();

// Write out size as capacity for behavioural compatibility with clone()
s.writeInt(size);

// Write out all elements in the proper order.
for (int i=0; i<size; i++) {
s.writeObject(elementData[i]);
}

if (modCount != expectedModCount) {
throw new ConcurrentModificationException();
}
}

5. 序列化

ArrayList 基于数组实现,并且具有动态扩容特性,因此保存元素的数组不一定都会被使用,那么就没必要全部进行序列化。

保存元素的数组 elementData 使用 transient 修饰,该关键字声明数组默认不会被序列化。

1
transient Object[] elementData; // non-private to simplify nested class access

ArrayList 实现了 writeObject() 和 readObject() 来控制只序列化数组中有元素填充那部分内容。

1
2
3
4
5
6
7
8
9
10
11
12
13
14
15
16
17
18
19
20
21
private void readObject(java.io.ObjectInputStream s)
throws java.io.IOException, ClassNotFoundException {
elementData = EMPTY_ELEMENTDATA;

// Read in size, and any hidden stuff
s.defaultReadObject();

// Read in capacity
s.readInt(); // ignored

if (size > 0) {
// be like clone(), allocate array based upon size not capacity
ensureCapacityInternal(size);

Object[] a = elementData;
// Read in all elements in the proper order.
for (int i=0; i<size; i++) {
a[i] = s.readObject();
}
}
}
1
2
3
4
5
6
7
8
9
10
11
12
13
14
15
16
17
18
private void writeObject(java.io.ObjectOutputStream s)
throws java.io.IOException{
// Write out element count, and any hidden stuff
int expectedModCount = modCount;
s.defaultWriteObject();

// Write out size as capacity for behavioural compatibility with clone()
s.writeInt(size);

// Write out all elements in the proper order.
for (int i=0; i<size; i++) {
s.writeObject(elementData[i]);
}

if (modCount != expectedModCount) {
throw new ConcurrentModificationException();
}
}

序列化时需要使用 ObjectOutputStream 的 writeObject() 将对象转换为字节流并输出。而 writeObject() 方法在传入的对象存在 writeObject() 的时候会去反射调用该对象的 writeObject() 来实现序列化。反序列化使用的是 ObjectInputStream 的 readObject() 方法,原理类似。

1
2
3
ArrayList list = new ArrayList();
ObjectOutputStream oos = new ObjectOutputStream(new FileOutputStream(file));
oos.writeObject(list);

Vector

1. 同步

它的实现与 ArrayList 类似,但是使用了 synchronized 进行同步。

1
2
3
4
5
6
7
8
9
10
11
12
13
public synchronized boolean add(E e) {
modCount++;
ensureCapacityHelper(elementCount + 1);
elementData[elementCount++] = e;
return true;
}

public synchronized E get(int index) {
if (index >= elementCount)
throw new ArrayIndexOutOfBoundsException(index);

return elementData(index);
}

2. 与 ArrayList 的比较

  • Vector 是同步的,因此开销就比 ArrayList 要大,访问速度更慢。最好使用 ArrayList 而不是 Vector,因为同步操作完全可以由程序员自己来控制;
  • Vector 每次扩容请求其大小的 2 倍空间,而 ArrayList 是 1.5 倍。

3. 替代方案

可以使用 Collections.synchronizedList(); 得到一个线程安全的 ArrayList。

1
2
List<String> list = new ArrayList<>();
List<String> synList = Collections.synchronizedList(list);

也可以使用 concurrent 并发包下的 CopyOnWriteArrayList 类。

1
List<String> list = new CopyOnWriteArrayList<>();

CopyOnWriteArrayList

读写分离

写操作在一个复制的数组上进行,读操作还是在原始数组中进行,读写分离,互不影响。

写操作需要加锁,防止并发写入时导致写入数据丢失。

写操作结束之后需要把原始数组指向新的复制数组。

1
2
3
4
5
6
7
8
9
10
11
12
13
14
15
16
17
18
public boolean add(E e) {
final ReentrantLock lock = this.lock;
lock.lock();
try {
Object[] elements = getArray();
int len = elements.length;
Object[] newElements = Arrays.copyOf(elements, len + 1);
newElements[len] = e;
setArray(newElements);
return true;
} finally {
lock.unlock();
}
}

final void setArray(Object[] a) {
array = a;
}
1
2
3
4
@SuppressWarnings("unchecked")
private E get(Object[] a, int index) {
return (E) a[index];
}

适用场景

CopyOnWriteArrayList 在写操作的同时允许读操作,大大提高了读操作的性能,因此很适合读多写少的应用场景。

但是 CopyOnWriteArrayList 有其缺陷:

  • 内存占用:在写操作时需要复制一个新的数组,使得内存占用为原来的两倍左右;
  • 数据不一致:读操作不能读取实时性的数据,因为部分写操作的数据还未同步到读数组中。

所以 CopyOnWriteArrayList 不适合内存敏感以及对实时性要求很高的场景。

LinkedList

1. 概览

基于双向链表实现,使用 Node 存储链表节点信息。

1
2
3
4
5
private static class Node<E> {
E item;
Node<E> next;
Node<E> prev;
}

每个链表存储了 first 和 last 指针:

1
2
transient Node<E> first;
transient Node<E> last;

2. 与 ArrayList 的比较

  • ArrayList 基于动态数组实现,LinkedList 基于双向链表实现;
  • ArrayList 支持随机访问,LinkedList 不支持;
  • LinkedList 在任意位置添加删除元素更快。

HashMap

为了便于理解,以下源码分析以 JDK 1.7 为主。

1. 存储结构

内部包含了一个 Entry 类型的数组 table。

1
transient Entry[] table;

Entry 存储着键值对。它包含了四个字段,从 next 字段我们可以看出 Entry 是一个链表。即数组中的每个位置被当成一个桶,一个桶存放一个链表。HashMap 使用拉链法来解决冲突,同一个链表中存放哈希值和散列桶取模运算结果相同的 Entry。
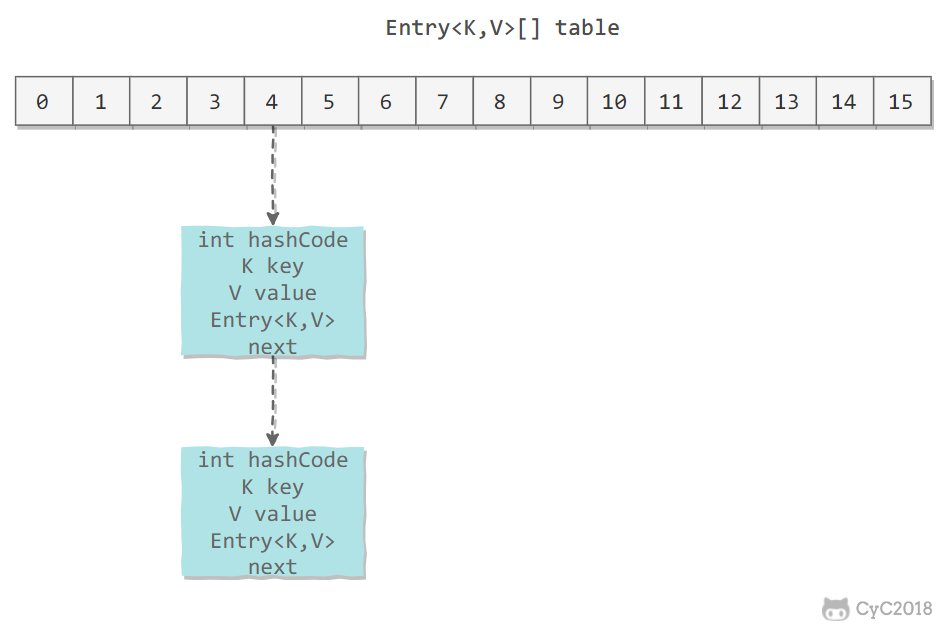
image.png

1
2
3
4
5
6
7
8
9
10
11
12
13
14
15
16
17
18
19
20
21
22
23
24
25
26
27
28
29
30
31
32
33
34
35
36
37
38
39
40
41
42
43
44
45
46
47
48
49
50
static class Entry<K,V> implements Map.Entry<K,V> {
final K key;
V value;
Entry<K,V> next;
int hash;

Entry(int h, K k, V v, Entry<K,V> n) {
value = v;
next = n;
key = k;
hash = h;
}

public final K getKey() {
return key;
}

public final V getValue() {
return value;
}

public final V setValue(V newValue) {
V oldValue = value;
value = newValue;
return oldValue;
}

public final boolean equals(Object o) {
if (!(o instanceof Map.Entry))
return false;
Map.Entry e = (Map.Entry)o;
Object k1 = getKey();
Object k2 = e.getKey();
if (k1 == k2 || (k1 != null && k1.equals(k2))) {
Object v1 = getValue();
Object v2 = e.getValue();
if (v1 == v2 || (v1 != null && v1.equals(v2)))
return true;
}
return false;
}

public final int hashCode() {
return Objects.hashCode(getKey()) ^ Objects.hashCode(getValue());
}

public final String toString() {
return getKey() + "=" + getValue();
}
}

2. 拉链法的工作原理

1
2
3
4
HashMap<String, String> map = new HashMap<>();
map.put("K1", "V1");
map.put("K2", "V2");
map.put("K3", "V3");
  • 新建一个 HashMap,默认大小为 16;
  • 插入 <K1,V1> 键值对,先计算 K1 的 hashCode 为 115,使用除留余数法得到所在的桶下标 115%16=3。
  • 插入 <K2,V2> 键值对,先计算 K2 的 hashCode 为 118,使用除留余数法得到所在的桶下标 118%16=6。
  • 插入 <K3,V3> 键值对,先计算 K3 的 hashCode 为 118,使用除留余数法得到所在的桶下标 118%16=6,插在 <K2,V2> 前面。

应该注意到链表的插入是以头插法方式进行的,例如上面的 <K3,V3> 不是插在 <K2,V2> 后面,而是插入在链表头部。

查找需要分成两步进行:

  • 计算键值对所在的桶;
  • 在链表上顺序查找,时间复杂度显然和链表的长度成正比。

3. put 操作

1
2
3
4
5
6
7
8
9
10
11
12
13
14
15
16
17
18
19
20
21
22
23
24
25
26
public V put(K key, V value) {
if (table == EMPTY_TABLE) {
inflateTable(threshold);
}
// 键为 null 单独处理
if (key == null)
return putForNullKey(value);
int hash = hash(key);
// 确定桶下标
int i = indexFor(hash, table.length);
// 先找出是否已经存在键为 key 的键值对,如果存在的话就更新这个键值对的值为 value
for (Entry<K,V> e = table[i]; e != null; e = e.next) {
Object k;
if (e.hash == hash && ((k = e.key) == key || key.equals(k))) {
V oldValue = e.value;
e.value = value;
e.recordAccess(this);
return oldValue;
}
}

modCount++;
// 插入新键值对
addEntry(hash, key, value, i);
return null;
}

HashMap 允许插入键为 null 的键值对。但是因为无法调用 null 的 hashCode() 方法,也就无法确定该键值对的桶下标,只能通过强制指定一个桶下标来存放。HashMap 使用第 0 个桶存放键为 null 的键值对。

1
2
3
4
5
6
7
8
9
10
11
12
13
private V putForNullKey(V value) {
for (Entry<K,V> e = table[0]; e != null; e = e.next) {
if (e.key == null) {
V oldValue = e.value;
e.value = value;
e.recordAccess(this);
return oldValue;
}
}
modCount++;
addEntry(0, null, value, 0);
return null;
}

使用链表的头插法,也就是新的键值对插在链表的头部,而不是链表的尾部。

1
2
3
4
5
6
7
8
9
10
11
12
13
14
15
16
void addEntry(int hash, K key, V value, int bucketIndex) {
if ((size >= threshold) && (null != table[bucketIndex])) {
resize(2 * table.length);
hash = (null != key) ? hash(key) : 0;
bucketIndex = indexFor(hash, table.length);
}

createEntry(hash, key, value, bucketIndex);
}

void createEntry(int hash, K key, V value, int bucketIndex) {
Entry<K,V> e = table[bucketIndex];
// 头插法,链表头部指向新的键值对
table[bucketIndex] = new Entry<>(hash, key, value, e);
size++;
}
1
2
3
4
5
6
Entry(int h, K k, V v, Entry<K,V> n) {
value = v;
next = n;
key = k;
hash = h;
}

4. 确定桶下标

很多操作都需要先确定一个键值对所在的桶下标。

1
2
int hash = hash(key);
int i = indexFor(hash, table.length);

4.1 计算 hash 值

1
2
3
4
5
6
7
8
9
10
11
12
13
14
final int hash(Object k) {
int h = hashSeed;
if (0 != h && k instanceof String) {
return sun.misc.Hashing.stringHash32((String) k);
}

h ^= k.hashCode();

// This function ensures that hashCodes that differ only by
// constant multiples at each bit position have a bounded
// number of collisions (approximately 8 at default load factor).
h ^= (h >>> 20) ^ (h >>> 12);
return h ^ (h >>> 7) ^ (h >>> 4);
}
1
2
3
public final int hashCode() {
return Objects.hashCode(key) ^ Objects.hashCode(value);
}

4.2 取模

令 x = 1<<4,即 x 为 2 的 4 次方,它具有以下性质:

1
2
x   : 00010000
x-1 : 00001111

令一个数 y 与 x-1 做与运算,可以去除 y 位级表示的第 4 位以上数:

1
2
3
y       : 10110010
x-1 : 00001111
y&(x-1) : 00000010

这个性质和 y 对 x 取模效果是一样的:

1
2
3
y   : 10110010
x : 00010000
y%x : 00000010

我们知道,位运算的代价比求模运算小的多,因此在进行这种计算时用位运算的话能带来更高的性能。

确定桶下标的最后一步是将 key 的 hash 值对桶个数取模:hash%capacity,如果能保证 capacity 为 2 的 n 次方,那么就可以将这个操作转换为位运算。

1
2
3
static int indexFor(int h, int length) {
return h & (length-1);
}

5. 扩容-基本原理

设 HashMap 的 table 长度为 M,需要存储的键值对数量为 N,如果哈希函数满足均匀性的要求,那么每条链表的长度大约为 N/M,因此平均查找次数的复杂度为 O(N/M)。

为了让查找的成本降低,应该尽可能使得 N/M 尽可能小,因此需要保证 M 尽可能大,也就是说 table 要尽可能大。HashMap 采用动态扩容来根据当前的 N 值来调整 M 值,使得空间效率和时间效率都能得到保证。

和扩容相关的参数主要有:capacity、size、threshold 和 load_factor。

参数 含义
capacity table 的容量大小,默认为 16。需要注意的是 capacity 必须保证为 2 的 n 次方。
size 键值对数量。
threshold size 的临界值,当 size 大于等于 threshold 就必须进行扩容操作。
loadFactor 装载因子,table 能够使用的比例,threshold = capacity * loadFactor。
1
2
3
4
5
6
7
8
9
10
11
12
13
14
15
static final int DEFAULT_INITIAL_CAPACITY = 16;

static final int MAXIMUM_CAPACITY = 1 << 30;

static final float DEFAULT_LOAD_FACTOR = 0.75f;

transient Entry[] table;

transient int size;

int threshold;

final float loadFactor;

transient int modCount;

从下面的添加元素代码中可以看出,当需要扩容时,令 capacity 为原来的两倍。

1
2
3
4
5
6
void addEntry(int hash, K key, V value, int bucketIndex) {
Entry<K,V> e = table[bucketIndex];
table[bucketIndex] = new Entry<>(hash, key, value, e);
if (size++ >= threshold)
resize(2 * table.length);
}

扩容使用 resize() 实现,需要注意的是,扩容操作同样需要把 oldTable 的所有键值对重新插入 newTable 中,因此这一步是很费时的。

1
2
3
4
5
6
7
8
9
10
11
12
13
14
15
16
17
18
19
20
21
22
23
24
25
26
27
28
29
30
void resize(int newCapacity) {
Entry[] oldTable = table;
int oldCapacity = oldTable.length;
if (oldCapacity == MAXIMUM_CAPACITY) {
threshold = Integer.MAX_VALUE;
return;
}
Entry[] newTable = new Entry[newCapacity];
transfer(newTable);
table = newTable;
threshold = (int)(newCapacity * loadFactor);
}

void transfer(Entry[] newTable) {
Entry[] src = table;
int newCapacity = newTable.length;
for (int j = 0; j < src.length; j++) {
Entry<K,V> e = src[j];
if (e != null) {
src[j] = null;
do {
Entry<K,V> next = e.next;
int i = indexFor(e.hash, newCapacity);
e.next = newTable[i];
newTable[i] = e;
e = next;
} while (e != null);
}
}
}

6. 扩容-重新计算桶下标

在进行扩容时,需要把键值对重新放到对应的桶上。HashMap 使用了一个特殊的机制,可以降低重新计算桶下标的操作。

假设原数组长度 capacity 为 16,扩容之后 new capacity 为 32:

1
2
capacity     : 00010000
new capacity : 00100000

对于一个 Key,

  • 它的哈希值如果在第 5 位上为 0,那么取模得到的结果和之前一样;
  • 如果为 1,那么得到的结果为原来的结果 +16。

7. 计算数组容量

HashMap 构造函数允许用户传入的容量不是 2 的 n 次方,因为它可以自动地将传入的容量转换为 2 的 n 次方。

先考虑如何求一个数的掩码,对于 10010000,它的掩码为 11111111,可以使用以下方法得到:

1
2
3
mask |= mask >> 1    11011000
mask |= mask >> 2 11111110
mask |= mask >> 4 11111111

mask+1 是大于原始数字的最小的 2 的 n 次方。

1
2
num     10010000
mask+1 100000000

以下是 HashMap 中计算数组容量的代码:

1
2
3
4
5
6
7
8
9
static final int tableSizeFor(int cap) {
int n = cap - 1;
n |= n >>> 1;
n |= n >>> 2;
n |= n >>> 4;
n |= n >>> 8;
n |= n >>> 16;
return (n < 0) ? 1 : (n >= MAXIMUM_CAPACITY) ? MAXIMUM_CAPACITY : n + 1;
}

8. 链表转红黑树

从 JDK 1.8 开始,一个桶存储的链表长度大于 8 时会将链表转换为红黑树。

9. 与 HashTable 的比较

  • HashTable 使用 synchronized 来进行同步。
  • HashMap 可以插入键为 null 的 Entry。
  • HashMap 的迭代器是 fail-fast 迭代器。
  • HashMap 不能保证随着时间的推移 Map 中的元素次序是不变的。

ConcurrentHashMap

1. 存储结构

1
2
3
4
5
6
static final class HashEntry<K,V> {
final int hash;
final K key;
volatile V value;
volatile HashEntry<K,V> next;
}

ConcurrentHashMap 和 HashMap 实现上类似,最主要的差别是 ConcurrentHashMap 采用了分段锁(Segment),每个分段锁维护着几个桶(HashEntry),多个线程可以同时访问不同分段锁上的桶,从而使其并发度更高(并发度就是 Segment 的个数)。

Segment 继承自 ReentrantLock。

1
2
3
4
5
6
7
8
9
10
11
12
13
14
15
16
17
static final class Segment<K,V> extends ReentrantLock implements Serializable {

private static final long serialVersionUID = 2249069246763182397L;

static final int MAX_SCAN_RETRIES =
Runtime.getRuntime().availableProcessors() > 1 ? 64 : 1;

transient volatile HashEntry<K,V>[] table;

transient int count;

transient int modCount;

transient int threshold;

final float loadFactor;
}
1
final Segment<K,V>[] segments;

默认的并发级别为 16,也就是说默认创建 16 个 Segment。

1
static final int DEFAULT_CONCURRENCY_LEVEL = 16;

2. size 操作

每个 Segment 维护了一个 count 变量来统计该 Segment 中的键值对个数。

1
2
3
4
5
/**
* The number of elements. Accessed only either within locks
* or among other volatile reads that maintain visibility.
*/
transient int count;

在执行 size 操作时,需要遍历所有 Segment 然后把 count 累计起来。

ConcurrentHashMap 在执行 size 操作时先尝试不加锁,如果连续两次不加锁操作得到的结果一致,那么可以认为这个结果是正确的。

尝试次数使用 RETRIES_BEFORE_LOCK 定义,该值为 2,retries 初始值为 -1,因此尝试次数为 3。

如果尝试的次数超过 3 次,就需要对每个 Segment 加锁。

1
2
3
4
5
6
7
8
9
10
11
12
13
14
15
16
17
18
19
20
21
22
23
24
25
26
27
28
29
30
31
32
33
34
35
36
37
38
39
40
41
42
43
44
45
46
47
48
49
50

/**
* Number of unsynchronized retries in size and containsValue
* methods before resorting to locking. This is used to avoid
* unbounded retries if tables undergo continuous modification
* which would make it impossible to obtain an accurate result.
*/
static final int RETRIES_BEFORE_LOCK = 2;

public int size() {
// Try a few times to get accurate count. On failure due to
// continuous async changes in table, resort to locking.
final Segment<K,V>[] segments = this.segments;
int size;
boolean overflow; // true if size overflows 32 bits
long sum; // sum of modCounts
long last = 0L; // previous sum
int retries = -1; // first iteration isn't retry
try {
for (;;) {
// 超过尝试次数,则对每个 Segment 加锁
if (retries++ == RETRIES_BEFORE_LOCK) {
for (int j = 0; j < segments.length; ++j)
ensureSegment(j).lock(); // force creation
}
sum = 0L;
size = 0;
overflow = false;
for (int j = 0; j < segments.length; ++j) {
Segment<K,V> seg = segmentAt(segments, j);
if (seg != null) {
sum += seg.modCount;
int c = seg.count;
if (c < 0 || (size += c) < 0)
overflow = true;
}
}
// 连续两次得到的结果一致,则认为这个结果是正确的
if (sum == last)
break;
last = sum;
}
} finally {
if (retries > RETRIES_BEFORE_LOCK) {
for (int j = 0; j < segments.length; ++j)
segmentAt(segments, j).unlock();
}
}
return overflow ? Integer.MAX_VALUE : size;
}

3. JDK 1.8 的改动

JDK 1.7 使用分段锁机制来实现并发更新操作,核心类为 Segment,它继承自重入锁 ReentrantLock,并发度与 Segment 数量相等。

JDK 1.8 使用了 CAS 操作来支持更高的并发度,在 CAS 操作失败时使用内置锁 synchronized。

并且 JDK 1.8 的实现也在链表过长时会转换为红黑树。

LinkedHashMap

存储结构

继承自 HashMap,因此具有和 HashMap 一样的快速查找特性。

1
public class LinkedHashMap<K,V> extends HashMap<K,V> implements Map<K,V>

内部维护了一个双向链表,用来维护插入顺序或者 LRU 顺序。

1
2
3
4
5
6
7
8
9
/**
* The head (eldest) of the doubly linked list.
*/
transient LinkedHashMap.Entry<K,V> head;

/**
* The tail (youngest) of the doubly linked list.
*/
transient LinkedHashMap.Entry<K,V> tail;

accessOrder 决定了顺序,默认为 false,此时维护的是插入顺序。

1
final boolean accessOrder;

LinkedHashMap 最重要的是以下用于维护顺序的函数,它们会在 put、get 等方法中调用。

1
2
void afterNodeAccess(Node<K,V> p) { }
void afterNodeInsertion(boolean evict) { }

afterNodeAccess()

当一个节点被访问时,如果 accessOrder 为 true,则会将该节点移到链表尾部。也就是说指定为 LRU 顺序之后,在每次访问一个节点时,会将这个节点移到链表尾部,保证链表尾部是最近访问的节点,那么链表首部就是最近最久未使用的节点。

1
2
3
4
5
6
7
8
9
10
11
12
13
14
15
16
17
18
19
20
21
22
23
24
void afterNodeAccess(Node<K,V> e) { // move node to last
LinkedHashMap.Entry<K,V> last;
if (accessOrder && (last = tail) != e) {
LinkedHashMap.Entry<K,V> p =
(LinkedHashMap.Entry<K,V>)e, b = p.before, a = p.after;
p.after = null;
if (b == null)
head = a;
else
b.after = a;
if (a != null)
a.before = b;
else
last = b;
if (last == null)
head = p;
else {
p.before = last;
last.after = p;
}
tail = p;
++modCount;
}
}

afterNodeInsertion()

在 put 等操作之后执行,当 removeEldestEntry() 方法返回 true 时会移除最晚的节点,也就是链表首部节点 first。

evict 只有在构建 Map 的时候才为 false,在这里为 true。

1
2
3
4
5
6
7
void afterNodeInsertion(boolean evict) { // possibly remove eldest
LinkedHashMap.Entry<K,V> first;
if (evict && (first = head) != null && removeEldestEntry(first)) {
K key = first.key;
removeNode(hash(key), key, null, false, true);
}
}

removeEldestEntry() 默认为 false,如果需要让它为 true,需要继承 LinkedHashMap 并且覆盖这个方法的实现,这在实现 LRU 的缓存中特别有用,通过移除最近最久未使用的节点,从而保证缓存空间足够,并且缓存的数据都是热点数据。

1
2
3
protected boolean removeEldestEntry(Map.Entry<K,V> eldest) {
return false;
}

LRU 缓存

以下是使用 LinkedHashMap 实现的一个 LRU 缓存:

  • 设定最大缓存空间 MAX_ENTRIES 为 3;
  • 使用 LinkedHashMap 的构造函数将 accessOrder 设置为 true,开启 LRU 顺序;
  • 覆盖 removeEldestEntry() 方法实现,在节点多于 MAX_ENTRIES 就会将最近最久未使用的数据移除。
1
2
3
4
5
6
7
8
9
10
11
class LRUCache<K, V> extends LinkedHashMap<K, V> {
private static final int MAX_ENTRIES = 3;

protected boolean removeEldestEntry(Map.Entry eldest) {
return size() > MAX_ENTRIES;
}

LRUCache() {
super(MAX_ENTRIES, 0.75f, true);
}
}
1
2
3
4
5
6
7
8
9
public static void main(String[] args) {
LRUCache<Integer, String> cache = new LRUCache<>();
cache.put(1, "a");
cache.put(2, "b");
cache.put(3, "c");
cache.get(1);
cache.put(4, "d");
System.out.println(cache.keySet());
}
1
[3, 1, 4]

WeakHashMap

存储结构

WeakHashMap 的 Entry 继承自 WeakReference,被 WeakReference 关联的对象在下一次垃圾回收时会被回收。

WeakHashMap 主要用来实现缓存,通过使用 WeakHashMap 来引用缓存对象,由 JVM 对这部分缓存进行回收。

1
private static class Entry<K,V> extends WeakReference<Object> implements Map.Entry<K,V>

ConcurrentCache

Tomcat 中的 ConcurrentCache 使用了 WeakHashMap 来实现缓存功能。

ConcurrentCache 采取的是分代缓存:

  • 经常使用的对象放入 eden 中,eden 使用 ConcurrentHashMap 实现,不用担心会被回收(伊甸园);
  • 不常用的对象放入 longterm,longterm 使用 WeakHashMap 实现,这些老对象会被垃圾收集器回收。
  • 当调用 get() 方法时,会先从 eden 区获取,如果没有找到的话再到 longterm 获取,当从 longterm 获取到就把对象放入 eden 中,从而保证经常被访问的节点不容易被回收。
  • 当调用 put() 方法时,如果 eden 的大小超过了 size,那么就将 eden 中的所有对象都放入 longterm 中,利用虚拟机回收掉一部分不经常使用的对象。
1
2
3
4
5
6
7
8
9
10
11
12
13
14
15
16
17
18
19
20
21
22
23
24
25
26
27
28
29
30
31
32
public final class ConcurrentCache<K, V> {

private final int size;

private final Map<K, V> eden;

private final Map<K, V> longterm;

public ConcurrentCache(int size) {
this.size = size;
this.eden = new ConcurrentHashMap<>(size);
this.longterm = new WeakHashMap<>(size);
}

public V get(K k) {
V v = this.eden.get(k);
if (v == null) {
v = this.longterm.get(k);
if (v != null)
this.eden.put(k, v);
}
return v;
}

public void put(K k, V v) {
if (this.eden.size() >= size) {
this.longterm.putAll(this.eden);
this.eden.clear();
}
this.eden.put(k, v);
}
}

参考资料